Friday, November 30, 2012

Cinnamon Rolls Instead of Donuts

This morning it was my hubby's turn to take donuts (or some such sweet things) to a meeting.  I knew about this a few days ago and so began thinking of some yummy and different creation that I could bake for him to take, since I had the time.  I chose cinnamon rolls.  I have a "quickie" version that I make using BIsquick, but I thought these should be of the yeast variety.  I had visions of the huge, cream-cheese frosted rolls from Campus by the Sea or the Gourmet Pie Shop or my donut shop across the street.   And so, I set out to make them.

Since we are having cold, rainy weather, I chose to use pre-made bread dough, although it might have been faster after all to use my bread maker as I still had to help the dough along with added heat.  My favorite frozen dough is made by Bridgford.  I purchased a package containing 3 loaves from the freezer section at the grocery store.  These were placed in a greased 9" x 13" pan and allowed to thaw for many hours.

Gather these supplies:
flour
rolling pin
sharp knife
butter, to soften
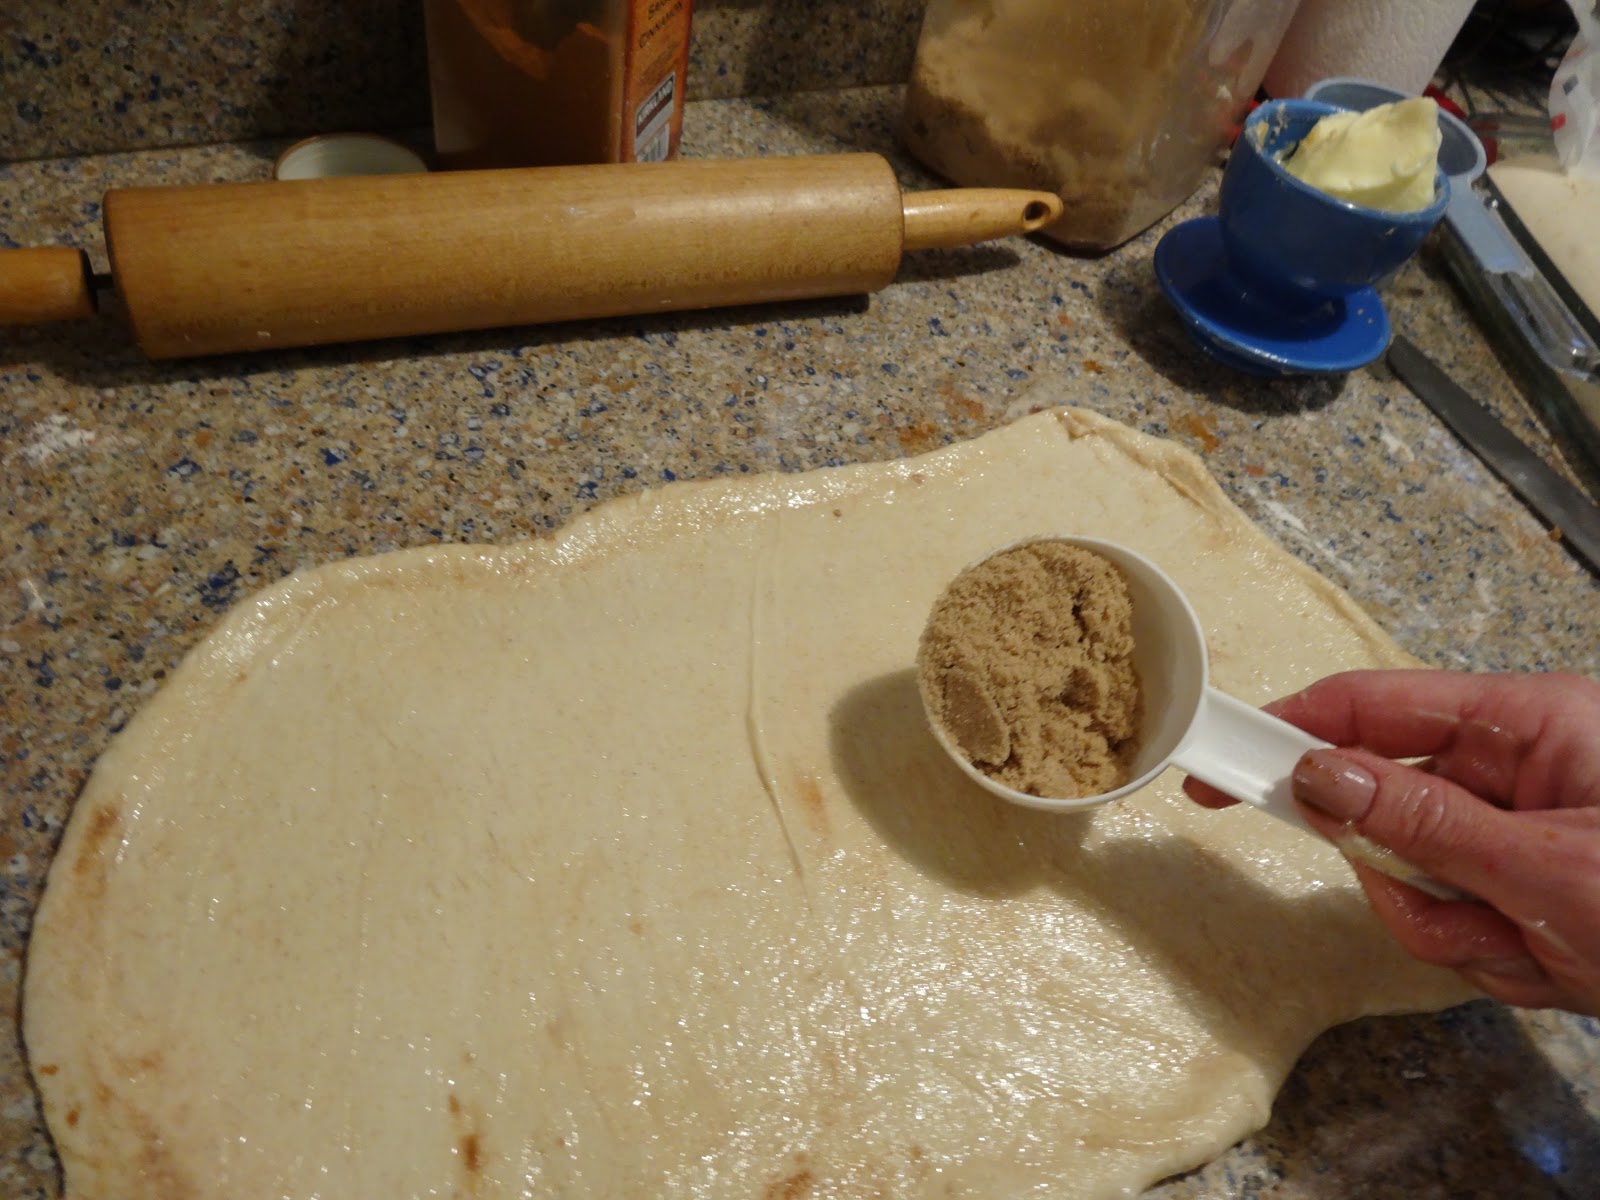
brown sugar (about 1 cup)
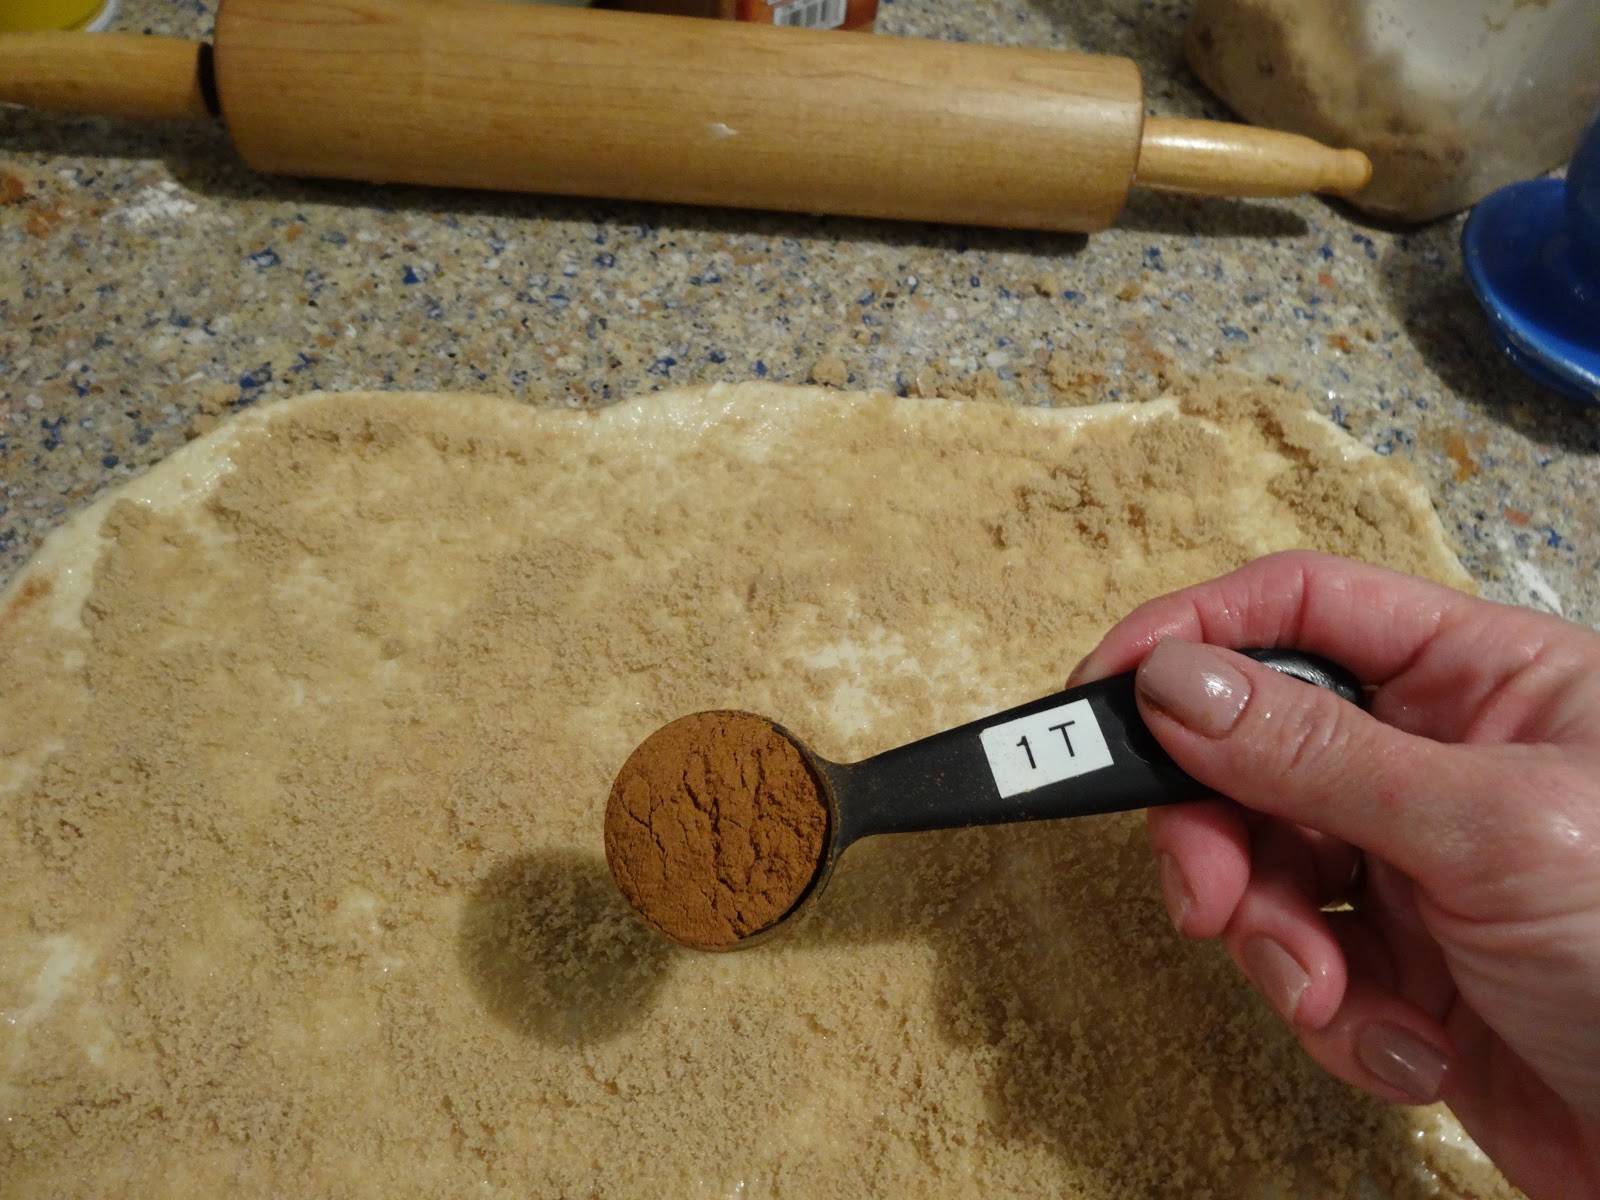
cinnamon, ground, about 1 T per loaf
large pans
no-stick spray

Once the loaves were defrosted enough to work with the dough, I began to roll them out, one at a time on a lightly floured surface into a large rectangle.

Using my hand, I spread a generous layer of butter all over the dough.
 Sprinkle about 1/3 to 1/2 cup of brown sugar over the butter.


Sprinkle this with 1 T ground cinnamon.

Begin rolling the dough from a short edge until you have a log.  Slice into 10-12 pieces and lay on greased pan.  Allow to rise until double in size.  The final size is primarily determined by the size they grow to in this process.  If your house is not warm enough to allow for rising, you may want to place the pans in front of a warm oven or under some lights for added heat.

Bake at 350 degrees F for 15-20 minutes.
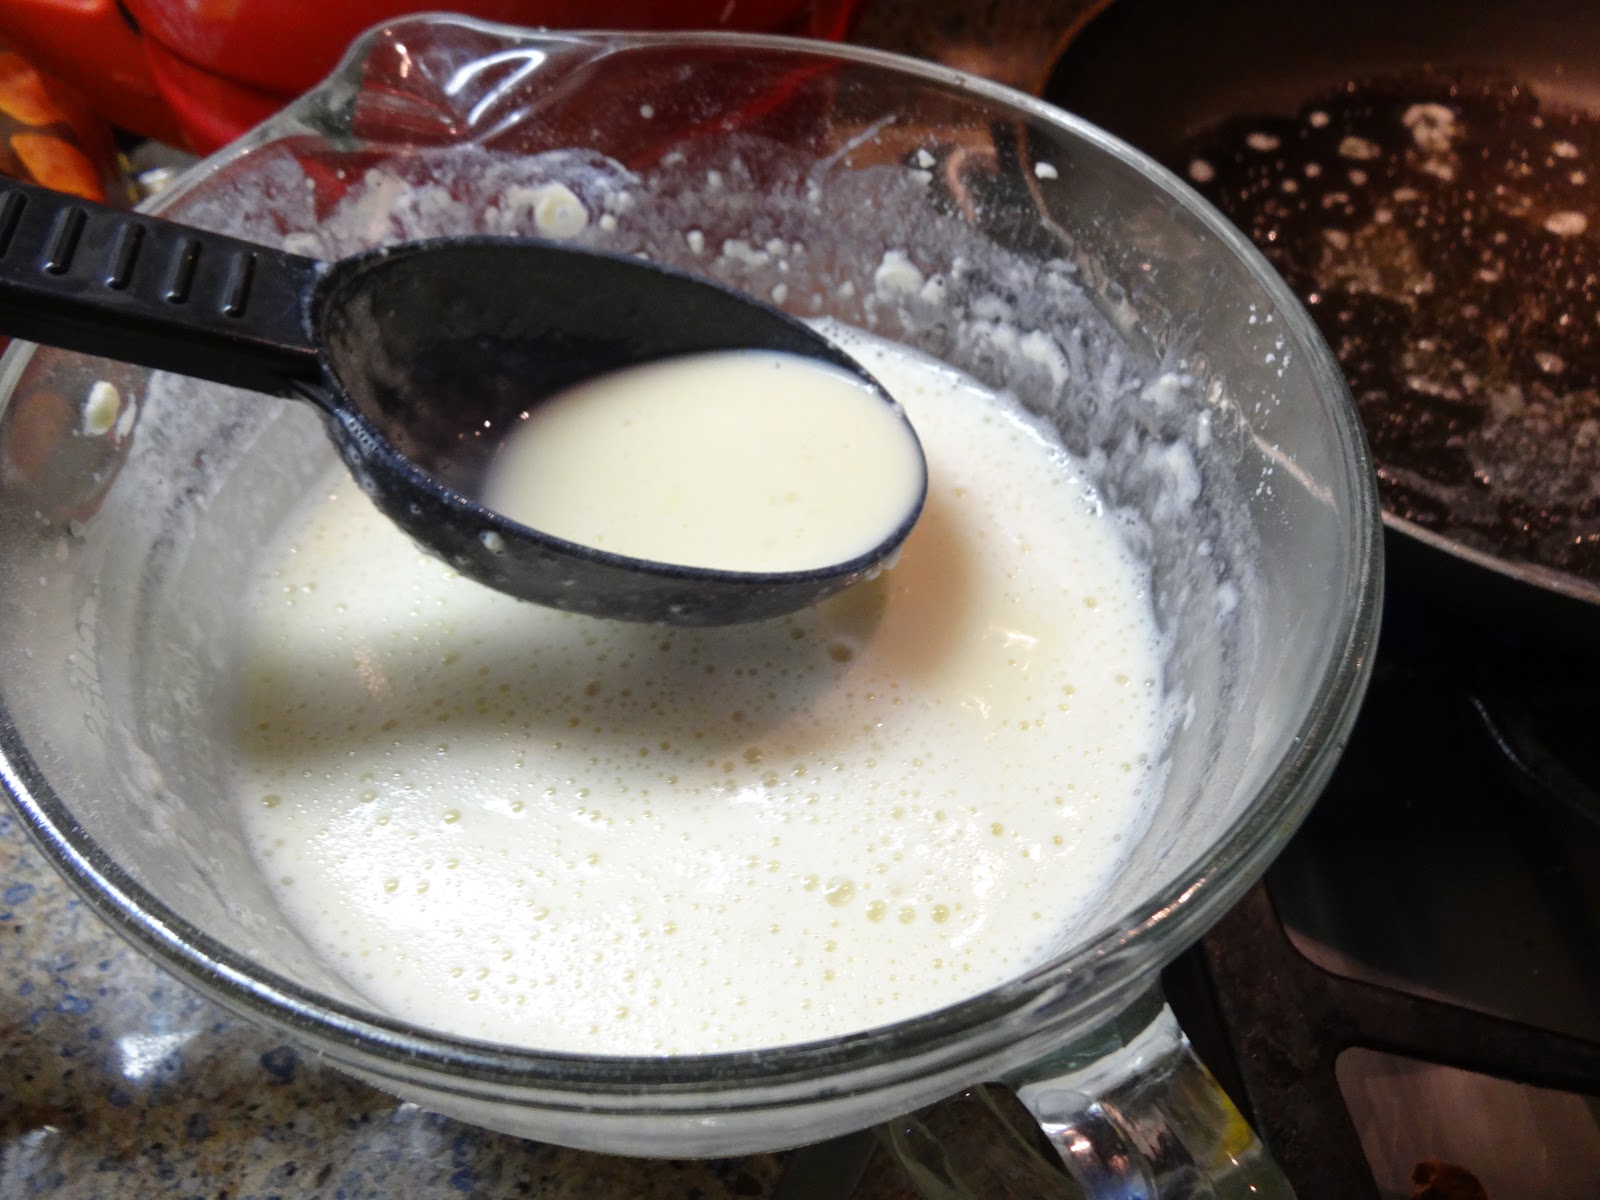
Cool and frost with Lyla's Cream Cheese Frosting:

1 - 8oz. package of cream cheese, very soft
1 tsp. vanilla
3 and 3/4 C or 1 lb. powdered sugar
1/3 C milk

Beat cream cheese.  Add other ingredients and continue mixing until smooth.  Gently frost rolls.

Post-Thanksgiving Crock-pot Dish (Slow-Cooked Chicken and Stuffing)

I tried a new recipe for the crock-pot yesterday and my family loved it!  I loved the ease with which it could be prepared both earlier in the month and frozen and yesterday as our meal.  I served it with our favorite mashed potatoes (see another blog post) and roasted green beans and mushrooms.  It looked great on the plate and tasted great, too!

Originally submitted by A. Marquart to the Fix-it and Forget It Cookbook , I've made a few tweaks to fit my OAM cooking style.

Cook 4 large boneless, skinless chicken breasts.  Cool.  Dice to make 5-6 cups of chicken.  Place in a Ziploc bag labelled for this recipe and freeze.

In a 9-cup freezer container labelled for this recipe, mix the following ingredients:
1/2 C chopped onion
1/2 C chopped celery
1/4 C dried parsley flakes
1 1/2 tsp. rubbed sage
1 tsp. poultry seasoning
1 tsp. salt
1/2 tsp. pepper
12 C day-old bread cubes (1/2 inch pieces)
1 4-oz. can mushroom pieces, drained (or you can add this on the day you cook the meal.)


Save in your pantry or on a shelf (mark them for this recipe - masking tape and a pen works just fine):
1 10 and 3/4 oz. can cream of chicken soup
2 1/2 C (20 ounces) chicken broth

You will also need:
2 eggs
1 C butter


On the day you cook the meal:
Melt the butter and mix in the soup and chicken broth along with 2 eggs.  Set aside.
In a 5-quart crock-pot layer stuffing mix with chicken alternately, for 4 total layers.  Pour liquid over the layers.  Cover and cook for 4-5 hours until a meat thermometer reads 160 degrees F.


Tuesday, November 27, 2012

Quick and Easy Cabbage Rolls

This morning my hubby told me he finished off the leftovers of the cabbage rolls.  Yeah!  More room in the fridge, but what I really liked was his comment that they reminded him of the ones his mom used to make.  How many times have you attempted to make something "just like his mom made?" Granted, he was forced to eat them as a kid and had little appreciation for mom's effort to fill and roll the cabbage leaves, but the flavor of mine created a sweet reminisence for him. 

My recipe does not require the rolling of cabbage leaves.  In fact, it couldn't be easier!  Simply buy a package of shredded cabbage in the produce section of your favorite store to cook in a crock-pot with a few other ingredients.

This recipe also freezes well until cooking day as seen in the photo below.
Cook the following together:
1 1/2 pounds ground turkey
1 medium onion chopped, (I used a red onion this time.)

Mix with the following in a 9-cup freezer container
1/2 C uncooked instant rice
1/4 C water
2 tsp. paprika
1 tsp. salt
1/4 tsp. pepper
1 - 15 oz. can chunky Italian style tomato sauce

5 cups coleslaw mix or shredded cabbage (do not freeze the cabbage)

To enjoy later:  Cool and freeze.  When ready to serve, defrost and place all ingredients and cabbage in crock-pot for 4-6 hours.

To enjoy tonight:  Place all ingredients and cabbage in a crock-pot on low for 4-6 hours, until cabbage is tender.

Sunday, November 25, 2012

I'm Dreaming of Some Christmas Bliss (White Chocolate Cranberry Bars)

Years ago, my taste buds fell in love with those delicious white chocolate cranberry creations at Starbuck's known as Christmas Bliss Bars.  The treat only appears in the window during the holiday season.  That meant too many months without this tasty pleasure and drove me to the kitchen to re-create this winter treat so that I could enjoy it year round.

Cream together:
1 C sugar
1 C brown sugar, gently packed
2 eggs
1 tsp. vanilla
1 C butter, completely melted

Add the following dry ingredients to the creamed mixture and mix well.

1 tsp. baking soda
1 tsp. baking powder
1/2 tsp. salt
3 1/2 C flour

Add:
1 C mini white chocolate chips or 1 12-oz. bag of same
1 C chopped, dried cranberries (Craisins area my favorites)

Mix well and spread on an ungreased jelly roll pan.
Bake at 350 degrees F for 20-25 minutes, until golden brown. 

While still warm, frost with 1 tub purchased white frosting. Sprinkle with 1C chopped, dried cranberries. Let dry.

Cut Into 12 large squares, and then into small triangles by cutting diagonally.
 
Makes 24 triangles.
 
 
Tips:
Chop the cranberries as noted above.
Use the regular canned frosting, not the whipped variety.
 
Just for fun:
Drizzle melted white chocolate over the bars.
Add chopped pistachios for an extra Christmasy look of red and green. (Thanks, Tiff!)
 
Enjoy!


Friday, November 23, 2012

Roasted Potatoes and Breakfast, too!

An oft-served side dish at our house is roasted potatoes.  Sometimes I even throw in asparagus stalks, whole green beans, and sliced mushrooms, or any combination thereof.  My thanks goes to Doug Smith, formerly of the Campus by the Sea kitchen. for this recipe.

It's very simple to prepare.
  • Preheat oven to broil.
  • Wash the veggies (I like to use red potatoes and thin stalks of asparagus.)
  • Quarter the potatoes such that they are more the shape of an apple slice than a chunk.
  • Place on a jelly roll or other cookie sheet with sides.
  • Generously drizzle with olive oil and sprinkle with McCormick Grill Mates Vegetable Spice.
  • Toss gently, but thoroughly so that all the veggies are covered.

Roast on the middle rack of your oven for 15 minutes.  Gently toss and return to the oven for 10-15 minutes more roasting until fork tender.  When doing just the green veggies, you can roast them in a 400 degrees F oven for about 15-20 minutes.


When I have leftover potatoes, I usually turn them into breakfast by dicing them and warming them in a well-greased frying pan.  Add a good handful of crumbled bacon, and stir together until the bacon is warm also.  To this mixture, pour in about 8-10 beaten eggs.  Stir quickly and continuously until the eggs are completely cooked.  Serve with toast or as the filling in a tortilla.   Shredded cheese is a nice addition, too.


Thursday, November 22, 2012

Creamed Corn for Thanksgiving

I am blessed to have a sister-in-law who loves to host Thanksgiving, and so we split the menu with me usually bringing the veggie side dishes.  This year the gathering includes so many families that I'll just be bringing the standard Campbell's Green Bean Casserole and homemade Creamed Corn.  I have to thank Sheli Jones for sharing this recipe with me over a decade ago.  It is still a family favorite and almost better the second day.

Sheli's Creamed Corn

2-16 oz. packages frozen corn (I like white corn best in this recipe)
3 C heavy whipping cream
3 T butter
3 T flour
4 T sugar
2 tsp. salt

Par-boil or steam the corn first while you are warming the cream in a large pot on the stove.   Add the corn to the cream and continue cooking until it boils, about 5 minutes.  Drain the cream, but save.  Set aside both. 

I melt the butter in a smaller saucepan while the corn is cooking in the cream.  Then add the flour, stirring quickly to prevent lumps.  Add the cream slowly whisking to keep it smooth.  Add sugar and salt.  Cook until thick.  Add corn and bring to a boil.

Now, if you've been reading my blog you just may have caught that I love to tweak things.  And so, here are my tweaks.
  • First of all was the steaming of the corn before cooking it in the warmed cream.  It used to be that I'd get a frozen mass of corn when adding it directly to cold cream and then it took forever to cook.
  • Secondly, I made the "white sauce" in a separate pan while the corn was cooking by melting the butter and adding the flour, sugar and salt.  Then I took about 3/4 C of cream from the pot and added it to the butter mixture.  I let it sit until the corn was done.
  • Once the corn was done, I drained most of the cream in to the smaller saucepan and mixed it well.  It immediately thickened and I was able to return it to the pot of corn mixing it into the remaining cream.


This is the best it's ever been!  And, yes it takes several pots and utensils but it is well worth the effort and the mess.  Happy Thanksgiving to you!


Using steamed, whole green beans was a nice change to this standard Thanksgiving fare.


Holiday Breakfast (Swedish Pancakes)

Holidays usually offer us an opportunity to spend more time preparing breakfast than a school or work day.  Here's one of our family favorites that was one of my very favorite breakfast meals when I was a child, Swedish Pancakes.  My Dutch dad made them the best, and it was always a treat to have some of the thin, crepe-like pancakes for breakfast, often on a Saturday morning.  He, like my Swedish grandmother, used an iron skillet for cooking these treasures, but I use two Teflon-coated frying pans.  These pans are never used for grilling onions or other strong flavors.

Serve these pancakes hot with butter and syrup or roll them up with fruit and cream inside or simply sprinkle them with powdered sugar.  Anyway you serve them, they are delicious.  The Swedes usually serve them with Lingonberries which can be purchased at IKEA stores.

Nana's Recipe for Swedish Pancakes
2 C milk (I use fat-free and add a bit extra flour, whole or lowfat milk works best)
2 eggs
1 C flour
1-2 T sugar

Mix well, but not frothy.

Heat the frying pans over medium to low heat.  Generously butter a frying pan with about 3/4 tsp. butter taking care not to burn the butter.


Pour about 1/2 C batter into the pan.


 If it's too hot the batter will sizzle and your pancakes will have a lattice look to them. 

Allow them to cook until the top is set.  Using a large-headed pancake turner, flip the pancakes and cook for a bit longer.  Repeat the process.

The perfect Swedish Pancake.

One recipe yields about 7 pancakes which feeds 2-4 people depending on how hungry they are and how much they love these pancakes.  To feed my family of 6, I usually use:
3 C milk
3 eggs
1 1/2 C flour
1/8 C sugar

Tuesday, November 20, 2012

Pumpkin Cookies for Dinner

Well, not exactly the main course, Pumpkin Cookies are on the menu for tonight's family gathering.  Since we are invited for dinner, I offered to bring dessert.  Two days before Thanksgiving rules out a pumpkin pie, so I pulled out a few fall family favorites that boast pumpkin.

Pumpkin Cookies (or Pillows by some recipes)

Cream together:
1 C butter, softened, not melted
1 C sugar
1 C canned pumpkin (not the pie filling)
2 eggs
1 tsp. vanilla extract

Add the dry ingredients:
1/8 tsp. salt
2 C flour
1 tsp. cinnamon
1 tsp. baking powder
1 tsp. baking soda

Optional:
1 9-ounce box of raisins

Drop by tablespoonfuls (or use the #30 1-ounce scoop) onto an ungreased cookie sheet.  Bake at 350 degrees F for about 20 minutes or in a convection oven at 325 degrees F for 18 minutes.  Cool the cookies and then frost with caramel frosting.

Caramel Frosting
1/4 C butter
 5 T milk
2/3 C brown sugar, packed

1 1/4 C powdered sugar
1 tsp. vanilla extract

To properly make the frosting, combine butter, brown sugar and milk in a medium saucepan.  Bring to a boil and cook for 2 minutes stirring constantly.  Cool.  Stir in powdered sugar and vanilla.  Beat with a hand mixer until smooth and creamy.

To make it another way (aka not reading the directions) that turned out just as delicious, combine all ingredients in a bowl and beat with a hand mixer until smooth.

Yield about 2 1/2 dozen cookies.  This recipe is easily doubled for about 5 dozen cookies.  Enjoy!

I am not sure who to credit with this yummy recipe.  I still use the recipe on the red paper that came home with one of my children when they were in Mrs. Ketchum's second grade class.


Another family favorite is the popular Libby's Pumpkin Roll with Cream Cheese Filling.  It is chilling in my fridge even as I type.  You can find the recipe inside the paper that covers a can of Libby's pumpkin or on their website.  I have learned to make two at a time.  The recipe easily doubles, and I get twice the goodies, but not twice the work or mess.


Monday, November 19, 2012

Monjas for Las Mujeres

At the conference in Honduras, two missionaries created this yummy treat that the women (las mujeres) absolutely love.  My guess is that you will, too!

With just four simple ingredients and a bit of time you can create this sweet and salty treat.  Here are the directions for the full-size version.

  • 1 box Ritz crackers
  • peanut butter, creamy works best
  • melting chocolates, vanilla or white chocolate
  • Thinning Flakes (from a cake decorating shop)

Spread peanut butter on one cracker and put another cracker on top.  Repeat  for 1-2 stacks of crackers.

In a double-boiler, put in about half the bag of melting chocolates.  Stir until fully melted.  Keep stirring with one hand.  With the other holding a pair of tongs, pick up a cracker and dip half of it in the chocolate.  Lay on a cookie sheet covered with waxed paper or parchment paper.  Repeat for all the crackers.


If the chocolate starts to become thick, add a pinch of thinning flakes.  Add this fat helps to thin the chocolate.  The addition of other liquids will ruin the chocolate.  You can add more chocolate and flakes until all the cracker sets are covered.  Allow to cool for several hours.


This year, we found a short-cut and used Ritz Bits.  The crackers are already filled with peanut butter and 1 pound of white chocolate will cover almost 4 boxes.


For a fun and even more delicious treat, use Mini Oreos.

Menus and Meatloaf

Most every morning, I take a look at my posted menu and pull that item from the freezer so that it can defrost throughout the day.  Often, I've looked at the menu the previous evening just in case an item needs an overnight thaw, such as a whole chicken or roast that will be cooked in the crock-pot the next day.  However, I didn't do that on Sunday.  I got home very late from our Sunday lunch out, and so at 3:00 p.m. I looked at the menu and  croaked.  I hadn't defrosted the crock-pot meal, and so perused the menu for a quick-cook item.  I chose meatloaf. 

Usually, I'd defrost this all day before baking for 1 hour.  But today, I only had two hours until dinnertime, so I got to try an experiment: how fast can my convection oven bake a frozen meatloaf?  The answer is "just under 2 hours." 

This Cheddar Meatloaf is a nice change of pace and taste.  I've learned to bake it with the foil over it to prevent burning.

In a large bowl mix the following together:
1 egg
3/4 C milk
1 C shredded Cheddar cheese
1/2 C quick cooking oats (I've used old-fashioned oats with success)
1/2 C chopped onion
1 tsp. salt
1 1/2 lbs. ground turkey
1/2 C ketchup
1/2 C packed brown sugar
1 1/2 tsp. prepared mustard

Shape mixture into a loaf and place in a greased bread/loaf pan. 

To enjoy later:  freeze in the loaf pan.  Defrost and follow directions below. 

To enjoy tonight:  Bake for 1 hour at 350 degrees F or for about 45-50 minutes in a convection oven at 325 degrees F.  Either way, a meat thermometer should read 180 degrees F when completely baked.

Not the best photo, but the loaf was delicious!


Saturday, November 17, 2012

Tortellini Soup

My family loves this variation of Tortellini.  I like it because it can be made in a crock-pot or in a pot on the stove which gives me lots of flexibility.

I originally found this on the internet, but didn't save the address.  However, I've rather tweaked the recipe anyway as I prefer my homemade white sauce base over the packaged variety.  I've also discovered that either broth works just fine and more tortellini is better.

1/2 C butter
1/2 C finely diced onion
1/2 C flour
1 14-oz. can of vegetable or chicken broth
4 C water
1 1/2 C sliced fresh mushrooms (3 - 4oz. cans mushrooms)
1/2 tsp. dried basil
1/4 tsp. salt
1/4 tsp. dried oregano
1/8 tsp. cayenne pepper
1 1/2 tsp. minced garlic

1 12 oz. can evaporated milk
1 1/2 pounds rainbow tortellini
1/2 C frozen spinach

In a large saucpan, melt the butter.  Stir in the onions and cook for 1-2 minutes.
Add the flour, stirring constantly until smooth.
Pour in the broth and stir until smooth.  Add the water and reduce heat to a simmer.
Add all the spices and the mushrooms.

To enjoy later, pour this into a container to freeze.  When you want to eat it, simply defrost and place in a crock-pot on low fro 5-6 hours, and then add the milk, tortellini and spinach cooking for 45 minutes longer.

To enjoy tonight:  Add the milk, tortellini and spinach. 

Optional:  Sprinkle servings with Parmesan Cheese.


Thursday, November 15, 2012

Perfect Pumpkin Muffies

Just the other day I ate a Pumpkin Muffy at Panera Bread.  Oh my!  It was beyond delicious!  I began a quest to create something just as delicious in my own kitchen.  I started by trying my favorite Pumpkin Bread recipe baked in a muffy pan, but it was too dense.  So I went to the web, and  I found a muffin recipe which gave me some place to start.  It turned out perfect!  Here's my version which added an egg and traded the pumpkin pie spice into separate measures for each spice.

1 1/2 C flour
1 tsp. baking powder
1/2 tsp. baking soda
1/2 tsp. salt
1 C canned pumpkin
1/3 C vegetable oil
3 large eggs
1 1/4 C sugar
1 1/2 tsp. cinnamon
1/2 tsp. ginger
2 shakes of nutmeg
2 shakes of cloves

Put everything into a large bowl and stir until well-mixed.  Put a large blob of batter into a greased muffy pan.  It should almost cover the bottom of each individual muffy.  Bake for 18-20 minutes at 350 degrees F.  Remove from pan to cool.  Allow pan to cool and repeat with remaining batter. Sprinkle muffies with powdered sugar or add a dollop of Caramel Cream Cheese Topper.

Caramel Cream Cheese Topper
Soften 8oz. cream cheese and whip with a hand-mixer.
Add 1/4 to 1/3 C caramel ice cream topping
Add 1/2 C powdered sugar

Yield:  9 muffies


A favorite topper, other than sprinkling powdered sugar is Caramel Cream Cheese.


Garlic-Cheese Biscuits

This recipe was originally published in Healthy Cooking (Aug-Sept 2012, p. 25) magazine, but I have tweaked it for my garlic lovers.  I am also not one to store various kinds of flours (the original called for 1 C each of all-purpose and cake flours.)  I keep my kitchen simple that way.   These biscuits are a healthier remake of Red Lobster's Cheddar Bay Biscuits.  So from Red Lobster to Healthy Cooking to me, you will love these biscuits!

Biscuits:
2 C all-purpose flour
1 1/2 tsp. baking powder
3/4 tsp. salt
1/2 tsp. garlic powder
1/4 tsp. baking soda
3 T cold butter
1/3 C finely shredded cheddar cheese (I use a cheddar/Jack blend)
1 C buttermilk (I have used fat-free milk when I am without buttermilk)

Butter sauce:
1 T butter, melted
1/4 tsp. garlic powder
1/2 tsp. dried parsley flakes

In a large bowl combine the first five ingredients.  Cut butter and mix in with a pastry blender or two knives.  Add the cheese and mix.  Pour in the buttermilk and stir until just moistened.  You may to gently knead all the ingredients together before scooping onto a greased (Pam works great!) cookie sheet.  I used my favorite #30 scoop which is 2 tablespoons. 

Bake for 10-12 minutes in a 425 degrees F oven.  Biscuits should be lightly browned. 

Make the butter sauce and brush over each biscuit.  Enjoy warm.

Yield: about 16 biscuits

Broccoli Cheese Soup for a Cool Fall Day

Fog this morning, clouds all day, and that hint of rain in the air make me think that fall is finally here to stay.  And today, I embraced it with boots, sweaters, and baking.  I also took a detour from our monthly menu and made Broccoli Cheese Soup for dinner.  What I love about this recipe is that all of the ingredients are staples in my kitchen so it is easy to fix at the last minute.

In a medium sauce pan, boil 1 1/2 C water with 3 cups of broccoli, both chopped and florets, until the broccoli is cooked.  Reserve the liquid.

In a large, deep skillet saute:
1 small onion, diced
1 T minced garlic
1 T butter

Add to this, 2 T flour and stir quickly and well.  Pour the reserved broccoli water into this mixture and stir until smooth.

Pour in:
1 1/2 C fat-free milk
1 1/2 C heavy whipping cream
(or any combination thereof to make 3 cups)

Bring to the point of boiling so that the sauce has thickened, but do not boil.

Add the following spices:
1/2 tsp. celery seed
1/2 tsp. salt
1/2 tsp. pepper
1/8 tsp. cayenne pepper

Finally, add the cooked broccoli and 4 slices of American cheese (it melts the best).  Simmer until cheese is melted.

I like to serve this with Garlic-Cheese Biscuits.  Yum!


Originally found in a magazine, I've tweaked this recipe to our tastes.

Wednesday, November 14, 2012

Every Dinner Needs Dessert - Black and White Cookies

My Black and White Cookies

In a glass bowl melt completely, 2 cups of butter

In a separate bowl (on a stand mixer preferably) mix:
2 C sugar
2 C brown sugar
2 tsp. vanilla
4 eggs
Add melted butter

To this mixture add:
2 tsp. baking powder
2 tsp. baking soda
1 tsp. salt
6 1/2 C flour, more if needed so thaot dough is not runny, and up to 7 1/2 C for high altitudes

1 C semi-sweet chocolate chips
1 1/4 C white chocolate chips (use good ones!)

Using a #30 or 1 oz. scoop, place 12 cookie balls on an ungreased baking sheet.  In a regular oven, bake one sheet at at time for 11 minutes at 350 degrees F.

In a convection oven, bake 3 sheets at a time for 10 minutes at 325 degrees F.

Cool for 2-3 minutes before removing to cooling racks, or waxed paper on a counter (my favorite method) to continue cooling.  Yield is about 6 dozen.

This recipe is easily halved.  However, being the freezer user that I am, make the large recipe, bake what you need and freeze the remaining dough as pre-made cookie balls. 

To do so: Continue scooping the dough into balls with the #30 scoop and place on a waxed paper lined cookie sheet.  Freeze.  When firm, place in Ziploc or other self-sealing bags.  I usually place a dozen in each bag.  This makes for a dessert-sized portions.  Write simple directions on the bag:  Bake at 350 degrees F for 11 min.  Return to freezer.

This has also made a nice thank you gift, especially frozen!

Tamale Shell Casserole


This recipe was a favorite of mine growing up.  I always thought my mom had created it until I saw a recipe for the same in a cookbook.  But like all good recipes, there are many versions and this is hers.


Brown:
1 to 1 1/2 pounds ground beef or ground turkey

Add:
2 15oz. cans tomato sauce
1 15oz can stewed tomatoes
1 tsp. garlic salt (or to taste)
1/2 tsp. pepper
sprinkle with chili powder and cumin, to taste  (more for a spicier dish)

Optional items:
1 green bell pepper, cut in chunks
1 onion, diced (I use 1/2 to 1 tsp of powder instead)

Ready to eat?
Cook 12 oz. of shell or elbow macaroni according to package directions.
After draining the pasta and returning it to the pot, add the sauce mixture and 4-6 cut-up tamales.

You can serve right from the pot or pour into a 9"x13" casserole and sprinkle generously with shredded cheddar or Mexican blend shredded cheese.  Place in 350 degree F oven until cheese melts, about 20 minutes.  Enjoy!

To enjoy later:
Freeze the meat, sauce, and spices in a 9-C container.  Freeze the tamales separately.  Put pasta in the cupboard labeled "Tamale Shell Casserole."  Defrost and follow directions for "ready to eat?"

Ready to freeze.
These are the tamales I used.

Tuesday, November 13, 2012

Once-a-Month Cooking Step 3 - Cooking Day

It's arrived!  Your first day to prep all the meals for a month of dinners.  Wear comfy shoes, grab your apron, and let's begin.  

Plan to go out to dinner tonight or order pizza or put something in the crock-pot right now, because you will be too tired to cook from scratch tonight.  :)  A crock-pot suggestions is chicken tacos.  Simply put several breasts in the crock-pot with a packet of taco seasoning.  I've also heard that adding a jar of salsa makes this a to-die-for recipe.

If you are making red sauce for pasta, begin with this so that it can simmer and cool while you prepare other meals.

Chop:  It is recommended that you chop all the onions and celery that you will need in advance.  If you purchased a block of cheese, make sure it is grated. 

Do you need cooked chicken?  If it will be diced, then set it boil now.  If it will be shredded, I prefer to cook it in a crock pot for 5-6 hours.  Shred with two forks and cool.

Ground Beef/Turkey:  Brown it a pound/package at a time and put in separate bowls.  Keep using the same pan and utensils until all the meat is cooked.

Stop here and finish the ground beef/turkey recipes to the point at which they can be frozen.

DO NOT freeze cream, sour cream, cream cheese or white sauces.  They do not hold up well after freezing.

Set aside the meals to cool before putting them in your freezer.  I like and have room to store the meals in the dish in which they will be prepared or in Rubbermaid containers, but I started by using gallon self-sealing bags when I had a side-by-side freezer/fridge.  Just be sure to label the items and add cooking directions, too.


I write directly on Heavy Duty Foil and use a label maker on dishes/pans.


After the ground beef/turkey dishes are complete.  I move on to the chicken recipes.  Again, complete the meals until the point of freezing, cool, and put in the freezer.
 
Do you have specialty meats?  A roast or such?  You may want to freeze it separately, and then prepare it fresh the day you will eat it.  I usually put such meals on the weekend or make sure that they are a crock-pot item for a weekday.
 
Continue to work through your menu until all the meals are prepared.  I usually put a dot with a highlighter in the the corner of the menu box to keep track of what's been prepared.
 
I often have my children prepare at least a meal each so that they learn kitchen vocabulary and how to read a recipe.  It also reduces my work load and gives me some company. 
 
I love my extra large freezer, but I didn't always have it.  For more than a dozen years I stacked a side-by-side freezer with meals in Ziploc bags.  Both styles work to get yummy, homemade food on the table for my family.


Monday, November 12, 2012

Once-a-month Cooking Step 2 - Shop

Before you head to the store, spend a bit of time organizing your list by store departments.  It will make your shopping so much easier.  You may even want to organize it by store, determining what you will buy at a warehouse store and what will come from a grocery chain.  We have two different groups of stores for our shopping:

              Costco, Target and Vons   or   Sam's Club, Walmart and Vons

I have found that each warehouse store offers different collections of food, and one may better meet my needs for the month of menus that another.  But, it will take a combination of stores to complete the shopping.  Most of my items come from the warehouse stores, but smaller amounts, say one can of soup, or a specialty ingredient will come from another store.  Our Target has a fabulous grocery section with excellent prices.  By the time I get to Vons, I usually only have a few fresh produce items or a couple of less-popular ingredients than other stores carry.

You may want to designate a separate shopping day from your cooking day.  This was great advice I received from the book, Once-a-Month Cooking.  It will take many hours the first time you shop for a month, but I now spend only about 2-3 hours shopping, and that included driving time. 

When I bring the groceries home, I put all the fresh meat in the fridge, frozen chicken goes in the freezer.  I leave the canned goods in bags until cooking day.  Why put away what I'm going to use right away?

Depending on the size of your freezer, you may want to forego ice cream and extra bread the week of cooking.  Once you eat a few meals you'll have room to stock up on these items again.

Sunday, November 11, 2012

Caramel Chocolate Bars

This is a favorite dessert that we serve at the Honduran Women's Bible Conference each January, and a favorite of our mission team.  It is ooey and gooey, and reminiscent of a candy bar.  Have a beverage handy!  Coffee or milk are recommended.  Enjoy!

2 C flour (add up to 1/2 C for high altitude)
2 C oatmeal
1 1/2 C packed brown sugar
1 tsp. baking soda
1/2 tsp. salt

1 1/2 C butter, melted

2 C chocolate chips
12 oz. caramel ice cream topping mixed with 1/4 C flour

Combine dry ingredients in a bowl.  Melt butter and mix together with dry ingredients.
In a 9" x 13" pan, pat 4 C of the crumb mixture into the bottom of the pan, forming a crust.  Bake at 350 degrees F for 15 minutes.  (13 min at 325F in a convection oven)

While still hot, sprinkle with the chocolate chips.  Pour caramel sacue over the chocolate chips.  Cover with the remaining 2 C of crumb mixture.  Crumble it over rather than patting it down.  Return to the oven and bake an additional 15 minutes (or 13 in a convection oven).  Cool overnight or at least several hours before cutting into bars.

Yield:  12 extra large bars or 35 smaller bars


This dessert is worth every one of the 18 Points Plus as calculated with the Weight Watchers Recipe Builder.  And who could eat less than 1/12 of the pan?


Wednesday, November 7, 2012

Overnight Salad aka Disappearing Salad

A number of years ago, my sister-in-law served this salad at a family party. It was quite the hit and has become a staple at my house ever since.  Built on a bed of romaine lettuce, this crunchy, cold, green salad is yummy for any meal of the day.  Just ask my daughters who have eaten if for breakfast and fought over the leftovers for lunch!  And while I'll suggest amounts of ingredients, you can increase or decrease according to your personal tastes.

3 heads of romaine lettuce, washed and chopped
1 bag of frozen peas (about 1 lb.)
1 can of water chestnuts, drained and coarsely chopped
4 stalks of celery coarsely chopped
1 bunch of green onions, sliced (about 8 stalks)
1/2 to 1 C crumbled bacon
1/2 C of mayonaise
Lawry's Seasoned Salt
3-5 hard-boiled eggs, sliced or chopped
1-2 large tomatoes, sliced or chopped

While this can be a beautiful centerpiece by building it in a trifle bowl, I want to be sure I get all the flavors, so I make it in a glass 9" x 13" pan.

Place lettuce in glass pan.  Cover with frozen peas.   Sprinkle with water chestnuts, celery, green onions and bacon.  With a rubber spatula, spread mayo over this layer.  It does not need to be thick unless you love mayo.  Sprinkle evenly, but somewhat sparingly with seasoned salt.  Either chop eggs and tomatoes, which I find best for truly scattering the flavors, or slice for a more formal look.  Chill overnight, all day or even just an hour or two.  It's best the longer the flavors can marry before eating, but it is also forgiving of your excitement to indulge.

To enjoy tonight:  Dish up and eat!

To enjoy later: The salad will hold for about 24 hours. As far a freezing goes, I only freeze the peas and bacon. Serve early in the month if part of a Once-a-month rotation so all the veggies will be fresh.


Chicken Salad Sandwiches

I had some leftover shredded chicken in the freezer and decided to turn it into Chicken Salad for an easy meal tonight and leftovers for lunches tomorrow.  This recipe is a take-off from a Weight Watcher's version which was 3 points plus per 1/2 C serving. I love grapes more than pimentos so you'll find fresh grapes in my version.

4 C shredded chicken
1/2 C diced celery
1/4 C sliced green onions
3/4 C quartered red grapes
1/8 C dried parsley
2 T lemon juice
1/2 C mayo (reduced fat if you like)
1/4 C plain Greek yogurt
1 tsp. salt
1 tsp. dried basil

Mix all ingredients together and enjoy!  I served it on fresh croissants, but you could use a lower calorie bread as well or enjoy it on a bed of chopped romaine lettuce.

To enjoy later:  This recipe will not freeze well due to the mayo, so just freeze the chicken and mix together when ready to enjoy.

Tuesday, November 6, 2012

Once-a-month Cooking Step 1 - Organize

Before you begin Once-a-Month Cooking, calendar two days; one for shopping and one for cooking.  They do not have to be back-to-back as long as you have refrigerator space for the fresh items until cooking day.  I usually shop Tuesday or Wednesday for a few hours and then cook on Saturday.

The first step in cooking once-a-month style is to gather your recipes.  From these, create a menu (Excel is a great tool!) and grocery list.  As best you can, try to group meats by bulk packaging at your favorite warehouse store for the best deals.

Over the years, I've created files in Excel that I just update with a new recipe now and then, or take off one we are tired of eating or I don't feel like making.  I've started color coding the menu titles by meats, too.  I have each month of menus and the corresponding recipes/directions in a 1/2" binder.  The binder sits on my counter all month for easy reference of recipes as I serve them.


Friday, November 2, 2012

Gravy

I tried something new last night when my son requested "good gravy" for the mashed potatoes.  Personally, the potatoes I made do not need a thing, other than a spoon to eat, but I indulged him.  Since I had marinated the beef in mesquite, I would not have the typical beef juices to create a gravy, and I wanted to save the drippings for au jus.

So, here's what I did.

Boil 2 cups of water in the microwave in a safe, glass bowl.
Add 3 tsp. of Beef Better than Boullion and disolve.

Take out about 3/4 of liquid and mix in about 1/3 C flour until smooth.
Slowly add this back into the boiling broth which should now be in a small saucepan over a low flame.  Stir quickly until all the flour mixture is absorbed.  Using a whisk will help to prevent clumps. 

It was quite nice.
"Good" Beef Gravy
 

Thursday, November 1, 2012

Birthday Dinner and Mashed Potatoes

For a birthday celebration meal I usually take a detour from my monthly menu.  Tonight's menu features the favorites of the birthday boy:

Mesquite seasoned Tri-tip (simply drizzle oil on meat and generously sprinkle with purchased seasoning.  Allow to marinate for 30 minutes to several hours before baking.)
The best mashed potatoes ever!
"good" gravy - hmmm.  (I am trying a new idea tonight.)
green beans (canned of course!)
garlic bread (We love "Johnny's" seasoning added to butter and broiled)
and Creme Brulee for dessert

I thought I'd share the potatoe recipe with you.  It's new to me and with a personal tweak, definitely a keeper!

4 lbs. potatoes, cleaned and quartered  (I keep the skins on.)
1 C heavy whipping cream
1/2 C fat-free milk
1/4 butter, softened
2 tsp. salt
1/2 tsp. pepper


Optional items:
3 green onions, chopped
3/4 C grated Parmesan cheese

Place potatoes in a large pot of boiling water and cook until easily pierced by fork.
Drain potatoes and return to pan.  Warm the cream and milk in the microwave and pour over potatoes along with butter, salt and pepper.  Mash by hand tool or whip with a hand-mixer until nearly smooth.  Enjoy!